Welcome in the assistant of Altimeter 3D. In this section you will find the basic principles for proper use of the application. Let us start at the beginning : the main menus.
![]()
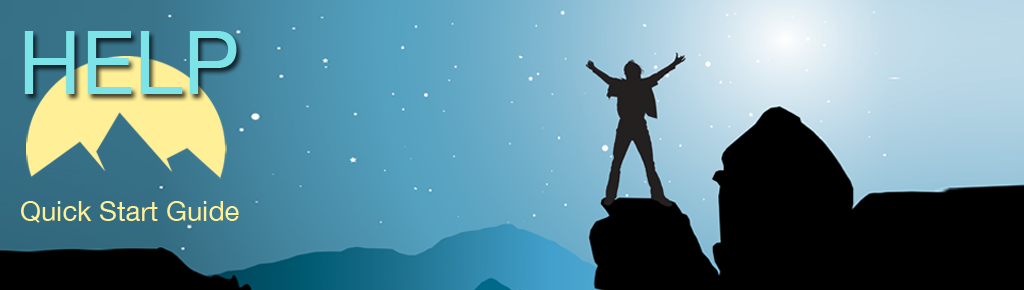
Altimeter 3D has 4 main menus :
Geolocation :
You will find in this menu all functions of geolocation.
Information : For all GPS data and information on the map.
Route : From this menu you can record a course, save, analyze and export. You can also load a course recorded for an analysis postponed.
Settings : Here is all the operating parameters of the application.
The "Geolocation" menu
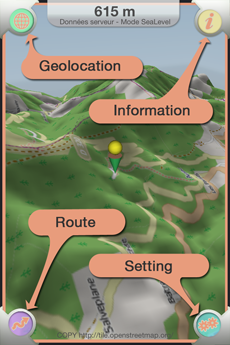
When you select the "Geolocation" menu, a submenu appears to the right of the screen.
The first button allows you to center the map on your location (only the map rotation is possible), or allow manual movement of the map (rotation and displacement map). This function is important in the application and you will often have to use it.
The "Information" menu
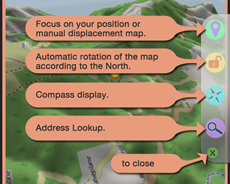
When you select the "Information" menu, a submenu appears to the left of the screen. It consists of 3 zones of information.
The first area (at the top of the window) indicates which mode of operation is the application. This statement is in direct relation to the first button in the "Geolocation" menu. The "GPS mode" indicates that the map is locked in position, the "Manual mode" indicates that you can move the map manually.
The second data field corresponds to the GPS status. Three color indicators show if the GPS provided reliable data (green: reliable data - Yellow: average data - red: data unusable). GPS always takes some time to start. We advise you to wait until the indicator turns green before measurements or record a course.
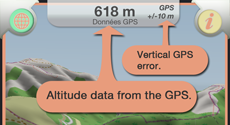
GPS information provides your location, the accuracy of your ground location, altitude and speed.
The third zone is useful in "Manual mode". In this mode, it provides information on the position of the central viewfinder, the distance between him and you and the actual zoom of the map.
The "Route" menu
When you select the "Route" menu, a submenu appears at the bottom of the screen.
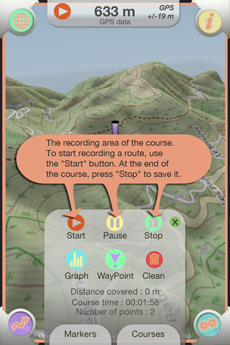

The use of these functions is explained in "in detail ..." section.
The "Settings" menu
When you select the "Settings" menu, the setting window appears.
We will not describe here the different options of uses. See Help "in detail ...".

![]()
The upper display always shows the altitude taken at the center of the map.
The measure may be derived from two different sources:
- In "GPS mode" the source is the GPS of your mobile or computer server. You can select the option that you want in the "Settings" menu.
- In "manual mode" the source is only computer server.


![]()
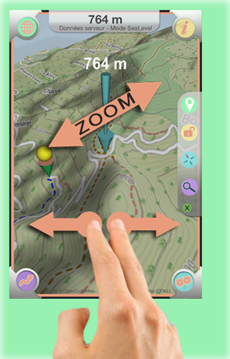
Rotate and zoom the map
The map rotation is performed with two parallel flat fingers on the screen simultaneously.
A horizontal movement of the two fingers allows a rotation around the central point.
A vertical displacement of the two fingers allows a change of viewing angle.
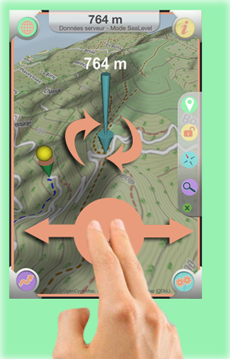
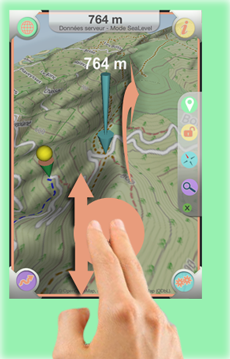
Zooming is performed with the distance between the two fingers.
Translational movement
The translational movement of the map is performed with one finger. This movement is not available in "GPS mode".
![]()
![]()
| This symbol represents your location. It always shows the place where you are. In "GPS mode", it is always shown in the center of the map. | |
| This symbol appears in "Manual mode" and it is always centered on the map. It always shows the altitude and position of the targeted location. | |
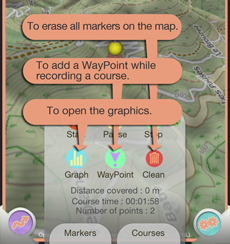
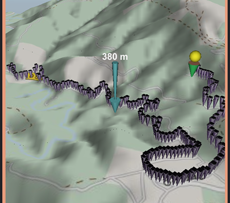
| Markers. While recording a course, this symbol is inserted on the map when the application saves a measurement. If you hit a course marker, an information window opens and shows you all the data saved. | |
WayPoint. This symbol appears when you press the "WayPoint" button, while recording course. It identifies the leading places in the course. |
|
| This symbol appears in "Manual mode" and when you touch the top of the viewfinder position. It remains fixed on the map and indicates the altitude at this point. It serves as a basis of measurement when measuring distance and elevation. | |
| The compass. |
![]()
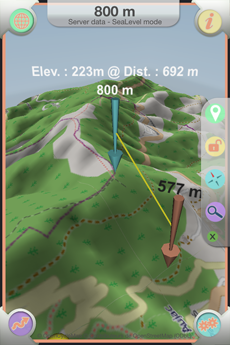
To perform measurements of distance and altitude, you put in "GPS mode" from the menu "Geolocation" (first button).
The central viewfinder appears.
Moving the map with your finger, you can measure any altitude.
For measuring distances and elevations, tap once with your finger up the viewfinder, another brown viewfinder appears. The latter remain fixed. By moving the card again, you'll indications of distance and elevation.
Design and Realization.
![]()
Design and Realization of
Website
Application Iphone / Ipad / Android