HELP
DIGITAL ALTIMETER
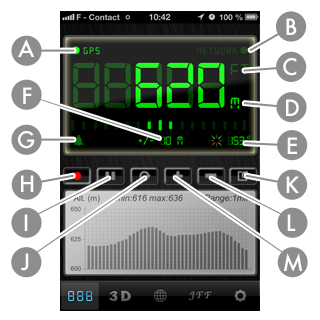
| A | Click here to switch on the GPS mode. In this mode, the altitude is provided by GPS. The accuracy of the measurement is shown below (see "F"). |
| B | Click here to start the Web Server Mode (NETWORK). In this mode, the altitude is provided by the web server. It is unique for a given position. The data refresh occurs when you move from a pre-defined distance (10, 50, 100 or 500 m / 32.8, 164, 328, 1640 ft show "Global Settings"). |
| C | Click here for the altitude in feet. |
| D | Click here for the altitude in meters. |
| E | Rotation compared to the north. |
| F | Measurement accuracy of the altitude in GPS mode. |
| G | Click here to set the alarm level. When the reference altitude is exceeded, an alarm will sound. To stop the alarm, press here again and choose 'Cancel'. |
| H | Click here to start recording altitude over time. |
| I | Click here to stop recording altitude. |
| J | Click here to clear the graph. |
| K | Click here to send by email a photo of the screen. |
| L-M | Click here to change the altitude recording speed. |
3D ALTIMETER
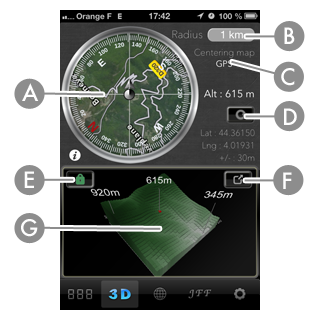
A - C |
Click here to switch on the address search. The map is then positioned on the selected place. |
| B | Click here to adjust the radius of map visualization and 3D graphics. You can also set here, the type of map to display. |
| D | Click here to refresh the map and 3D graphics. |
| E | Click here to unlock the rotation of 3D graphics. So, it's possible to make enlargements and rotations of 3D graphics. |
| F | Click here to enlarge the 3D graphics. |
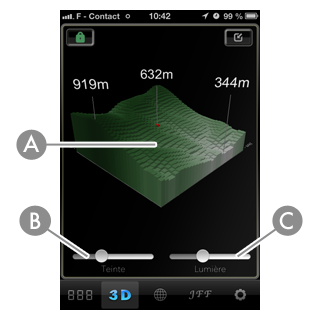
| A | When the chart is unlocked, you can with your fingers manipulate 3D graphics. - Moving the finger from left to right will rotate around Y. - Move a finger up and down allows you to rotate around X. - Lead fingers (left - right) allows for expansion. |
| B | Click here to set the tint of the graph. |
| C | Click here to adjust the brightness of the graph. |
"CURVES LEVELS" ALTIMETER
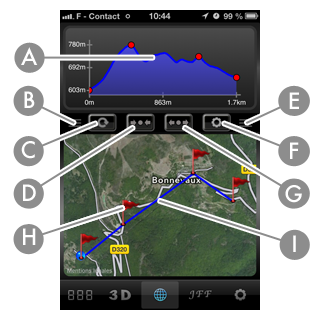
| A | 2D visualization of level curve. The red dots indicate the step of the way. |
| B - E | Click here to drag up or down two screens. This way you can enlarge or reduce the graphics and the map window. |
| C | Tap to delete the route. |
| D | Click here to center the map on the position of mobile (GPS). |
| F | Click here to open the Control Panel. |
| G | Click here to find and center the map on an address. |
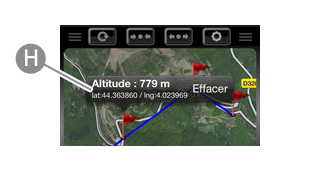
| H | Flags of steps. To insert a step flag, press 1 second on the screen. To see the coordinates and altitude of the step, briefly press the flag (the altitude and location information is displayed). To move a flag, briefly press the flag and then press 1 second the window of information. The flag becomes mobile and you can set it where you want. To delete a step, press the "Delete" button in the information window. |
| I | Layout of the course. |
JFF
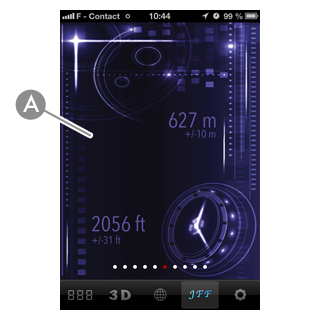
| A | To change the altimeter, you must drag your finger across the screen from left to right. To change the unit of measurement or for the error rate measurement, press briefly on the screen |
GLOBAL SETTINGS
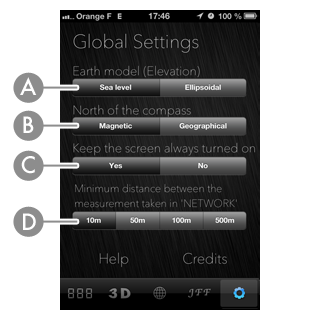
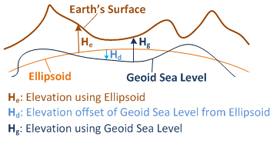
| A | The altitude measurement in Internet Server mode (NETWORK) can be performed in two models. - Sea Level: The altitude is given in relation to sea level standard EGM2008 2.5 '. - Ellipsoidal: The altitude is provided in relation to the shape of the earth. WGS84 standard.
|
| B | The compass can indicate magnetic north or true north. |
| C | Keeps your mobile screen always on while using the application. |
| D | Minimum distance between two measuring altitude in the Internet Server mode (NETWORK). Increasing this distance reduces the energy consumption of the application. |
![]()